
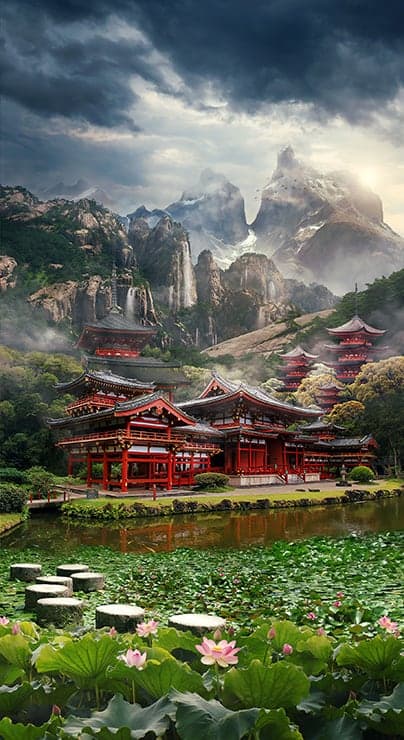
Learn how to create this beautiful mountain landscape in Photoshop. This tutorial shows how to develop a amazing and meditative landscape of the mysterious East theme out of a plain background using photo manipulation, photo montage techniques coupled with some painting inside Photoshop.
What you’ll be creating
First of all we will create foreground atmosphere using temple and lotuses photos. In next part add towers to expand the landscape and make the transition between plans. Then we will create a surreal mountain landscape and add a variety of color effects. In the final step, we will create light effects and sun. Finish it up with using adjustments layers properly. I have used Photoshop version CC 2014 to create this work but you cam use any version from CS onwards will be fine as well.
Tutorial Resources
- Byodo-In Temple – Cynnalia-Stock
- Miyajima Temple – firenze-design
- Temple 3 – mimose-stock
- Huangshan – meihua-stock
- Patagonian landscape – fuguestock
- Koi – Alegion-stock
- Sky – sacral-stock
- Stepping stones – Ekuboryu
- Lotuses – Chinese-stock
- Effects Brushes – Vincent-Montreuil
- Waterfall – Della-Stock
- Loto flower PNG – DarkSideofGraphic
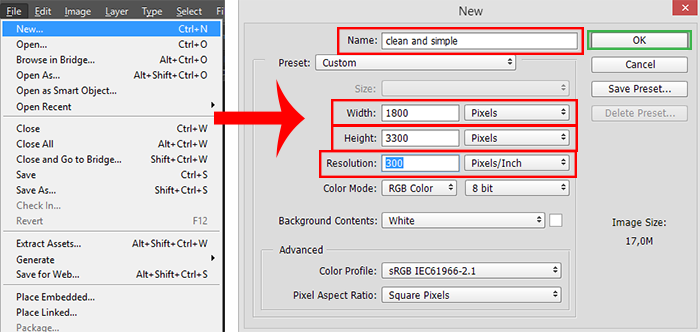
Step 1
Opening Photoshop and get started! Create a new document at 1800 pixels wide and 3300 pixels height, resolution 300 Pixels/Inch.
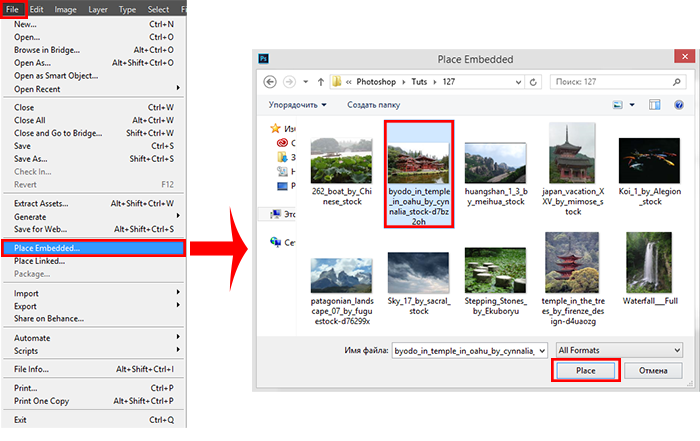
Step 2
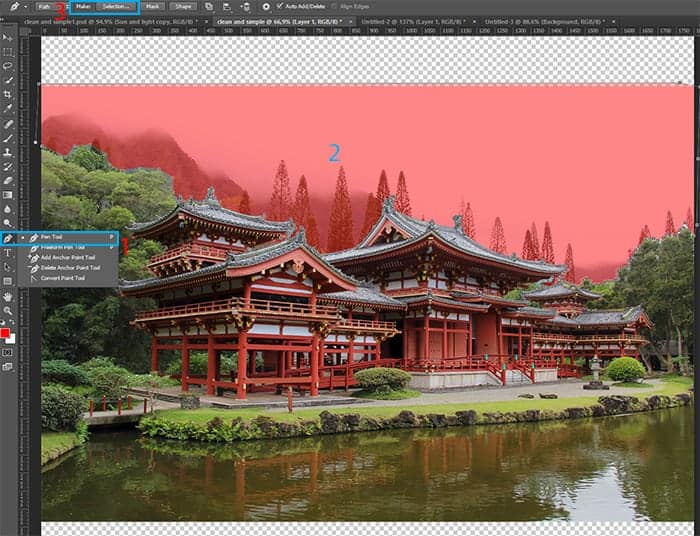
Now, we’re going to create the base of our artwork. I started with the first central temple. It was from its position I can move on and build a correctly perspective. Go to File > Place (Place Embedded) and add in working document image “byodo_in_temple_in_oahu_by_cynnalia_stock-d7bz2oh”.
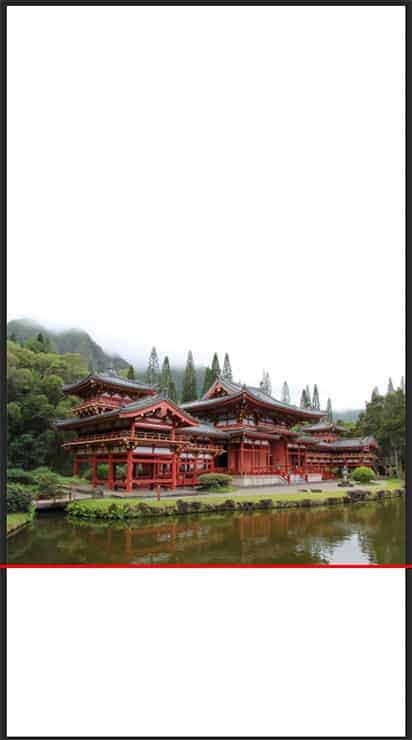
Step 3
In the case of vertical image, I did not change the original size of the photo. I positioned it so that the photo started with 2536 pixels height up. Try to place the picture precisely, so as not to background stood out (to make it easier to hide the background layer by clicking the eye icon next to the layer).
Step 4
I immediately removed the fog and pyramidal trees, that it does not interfere. For this I used Pen Tool (P). I need a clear and straight edges of the temple. If you use other tools as Quick Selection Tool (W) you will get rough edge and some unnecessary items can stay. For matte painting every detail is important and forms the basis for a good picture. Leave trees on the left and right sides of the image. When you selected trees do not need to exactly follow the contour, leave some free space above them as well as at the edges of roofs. From created path make a selection (right – click on image or button on upper Options panel).
Step 5
Make Feather: 0px, set checkbox on “New Selection” and click OK. Improve the selection and remove the extra. First inverse Selection (Cmd/Ctrl + Shift + I or Select > Inverse) and go to Refine Edge (Opt/Alt+ Cmd/Ctrl + R or Select Refine Edge). In Refine Edge set checkbox on “Smart Radius” and set Radius: 0.3px. Use brush in this window and several times draw it along the edges of the trees, where stayed background. After all click OK.
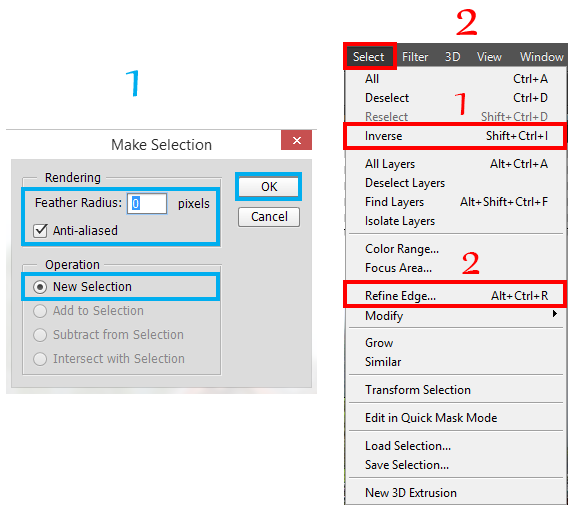

It remains to remove background. Add a layer mask by clicking on the Add Layer Mask button in the layers panel or by going to Layer > Layer Mask > Reveal Selection.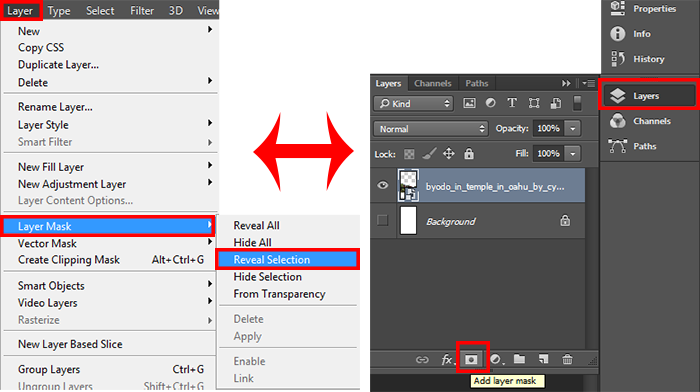
Step 6
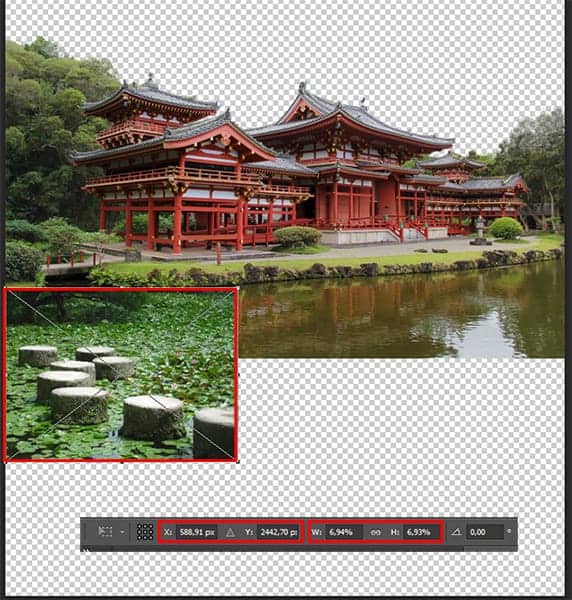
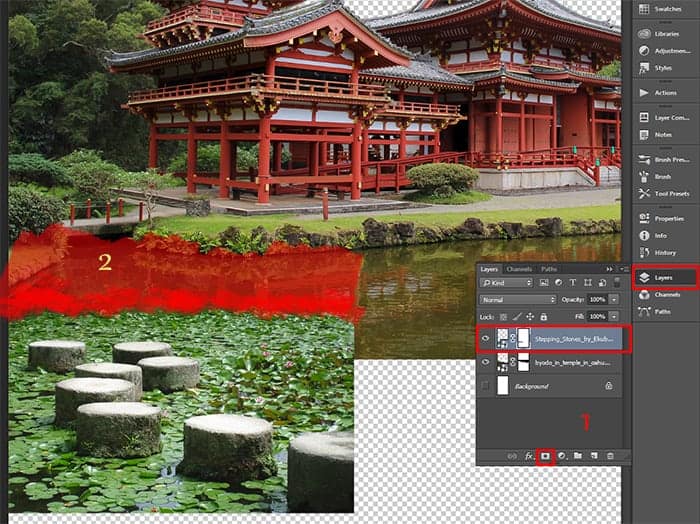
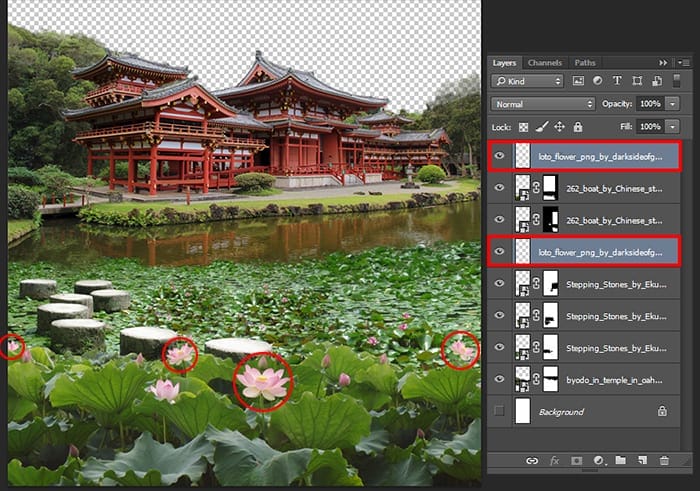
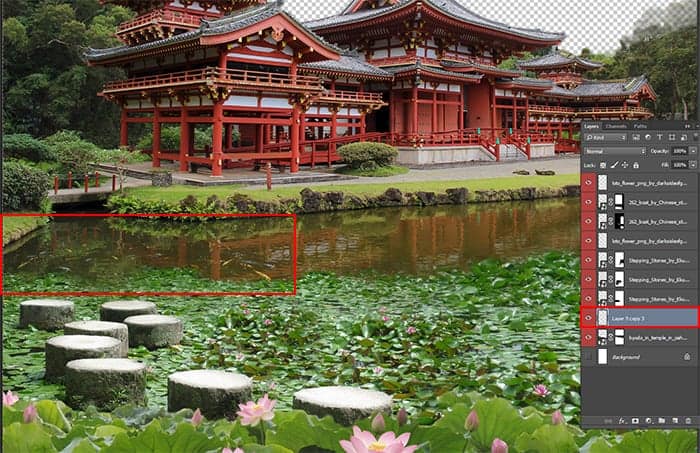
We go further. The next step, I began work on the first plan. I added in working document (File > Place (Place Embedded)) a small lotuses (Stepping stones) image “Stepping_Stones_by_Ekuboryu”. Resize it so lotuses be smaller (Ctrl/Cmd+T or Edit > Free Transform) and place them between temple coast and the left edge of the image.
Step 7
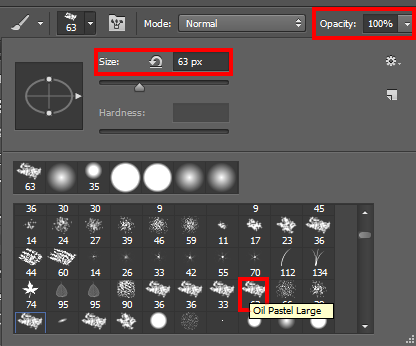
Add a Layer mask to both layers and use Brush Tool (B) (Brush form “Oil Pastel Large”, Size: 63, Opacity: 100%) to remove from water part of the plant. Make sure that would have removed part of the image where the plants darkened from tree. Do not make a smooth edge of plants, otherwise you will lose the realism. Play a bit with the form that the plants were dynamic but without sharp conversion.
Step 8
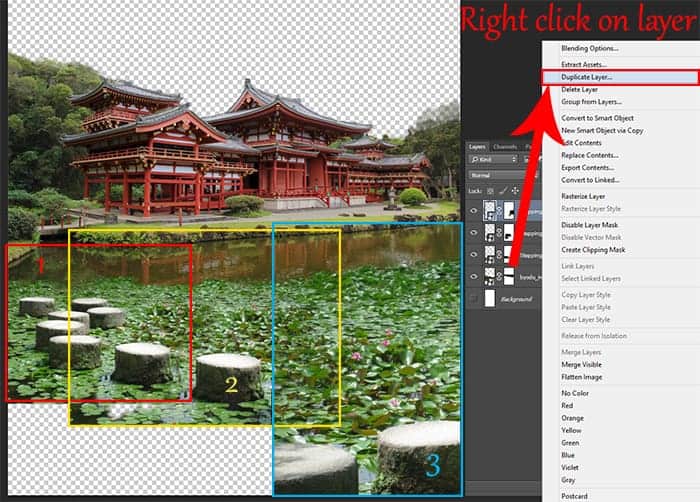
Duplicate two times this layer (to do this, use Cmd/Ctrl + J or go to Layer > Duplicate Layer), because we will need to cover remaining empty space and increase the river and make the transition between the large lotuses, which we then added. Increase second and third layers so that plants have been a little bigger than previous (just a bit), place them in a stepwise manner, but try to observe the type of plant (texture must matched). The third layer I Flip Horizontal (Edit > Transform > Flip Horizontal) to not use a dark area. So I can use the more useful parts of the image and ensure harmony.
Step 9
With a Soft Round brush (Size 70px, Opacity: 100-70%), on a layer masks I lined texture of plants to make the transition between layers. You can not leave it in this form :). Be careful with a big stone on a second layer, it must been not visible. With the same stones, remove unwanted stones, only very gently without damaging texture. For the third layer with water plants use a brush from Step 7 to make the uneven edge for plants.

Step 10
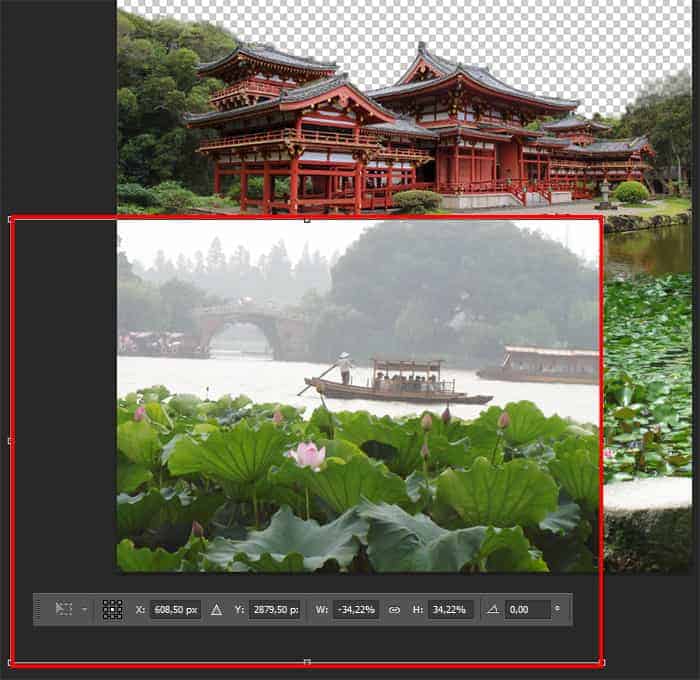
I added in working document (File > Place (Place Embedded)) a large lotuses “262_boat_by_Chinese_stock”. Quite a bit to increase the size of lotuses (Ctrl/Cmd+T or Edit > Free Transform). Select lotuses, used Quick Selection Tool (W) and add layer mask to this layer.
Step 11
Duplicate once this layer (to do this, use Cmd/Ctrl + J or go to Layer > Duplicate Layer). A little reduce size and move this layer under previous lotuses layer. Arrange them so that the images overlap. I recommends that you first select the desired fragment and not use reflection to this layer (Flip Horizontal). Otherwise, the picture loses its harmony and becomes not lose integrity. To make the leaves a little different and get rid of the light background in some places, I removed some parts of the layer mask with a small soft brush.
Step 12
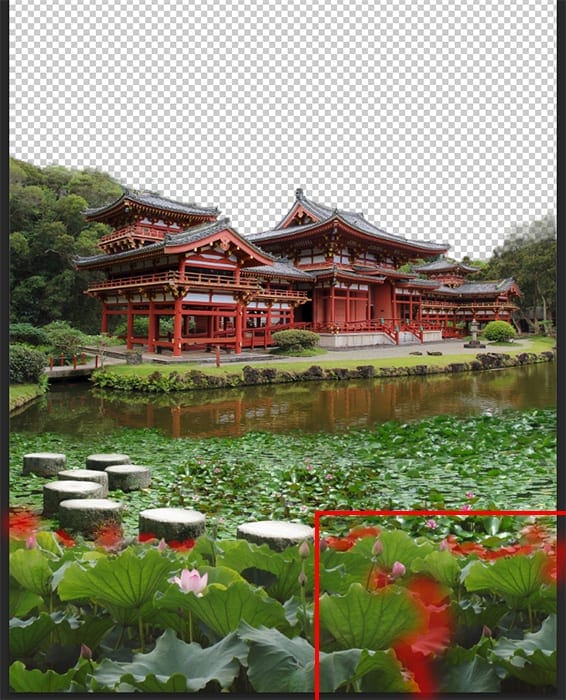
Lotus is perhaps the most famous and sacred plant. But the vast majority of these beliefs combines basic concept denoted Lotus: purity by light. Lotus rhizome immersed in the mud, but the flowers and leaves its pure and untainted. Flowers raised high above the water, over land. Is not it beautiful and instructive!
I thought it necessary to add a few bloomed lotus flowers to diversify and give affection. Place (File > Place (Place Embedded)) image “loto_flower_png_by_darksideofgraphic-d6ck3z4″ in working document. Reduce the flowers that they were about the size as on original photos and arrange them different parts of the image. I advise you to place some layers before the layers with lotuses and behind them. Also, do not replace all the buds on the flowers, otherwise you will lose the harmony. Try to arrange the flowers in the foreground on sticks buds. Total I used 4 flower. To Merge flower layers use Cmd/Ctrl + E or Layer > Merge Layers…
Step 13
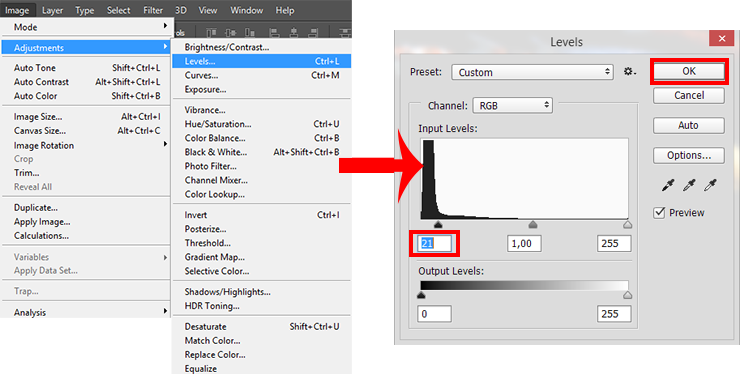
To put the point in the work on the first plan, add the finishing touches – koi fish. Koi – it is one of the gems of east. With them is associated with many legends and this fish is highly respected, it has long been revered as a symbol. I added them much later when doing this artwork, but you better do it now. Open image “Koi_1_by_Alegion_stock” (go to File > Open or use Cmd/Ctrl+ O). As you can see, background is not enough black to select the fishes, so press Cmd/Ctrl + L or go to Image > Adjustments> Levels… Set for Blacks: 21, for Whites: 225 and click OK. I increased the maximum black to get rid of noise and color spots on the background and reduced a little of maximum brightness to make a little contrasted fishes.
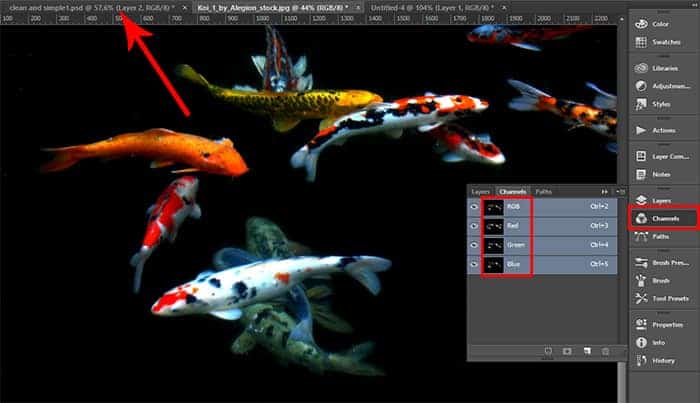
Go to Channels tab, hold Cmd/Ctrl and click on RGB thumbnail to select fishes from background. Use Move Tool (V) or hold Cmd/Ctrl to switch into it and drag a fishes in your working document. This is a very easy way to quickly select the colorful image from the black background. Depending on the different channels, the colors are paler or saturation. In this case, the fish will be slightly transparent, making them realistic in water.
Step 14
Reduce the size of the fishes to a little less than the distance between the water plants and shore (Ctrl/Cmd+T). To transform the image proportionally hold Shift. Duplicate fishes 4 times (Cmd/Ctrl + J) and change the size of a slightly larger and smaller fishes, flip layers horizontally (Edit > Transform > Flip Horizontal) to make visible the diversity of fishes, arrange some little under water plants. All you want. This is a creative process and you can make your own version. After all the transformations I merge the layers with the fishes in one (Cmd/Ctrl + E). Place the layer with the fishes above layer with the temple to randomly fish have not started to go down the water lilies.
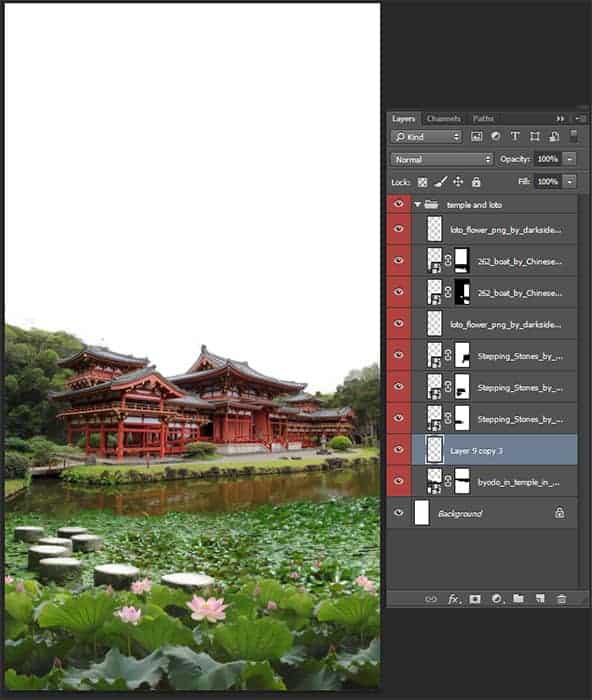
Here is my result. I combined all layers with the first plan and the main temple in one group “Temple and lotuses”. That’s it! In this work on the first plan until finished and you can move on. Be sure that your image does not leave white stripes on the edges of document (this means that the image does not reach the edge of the document). If there is one, use the arrow keys and move the desired layer and if necessary, increase the image. Check it always and use Zoom Tool (Z).
from Photoshop Tutorials http://ift.tt/1Eqqq4v
via IFTTT

0 Comments